Quick Summary: How to Change the Makita Rear Shaft 165669-8 in XML02
- Content Type: Hand Tested Review
- Last Updated: August 1, 2025
- Fact-Checked By: Azlan - Smart AI Gears team member
- Best For: DIYers and tool owners looking to perform specific repairs on their Makita XML02 mower to extend its lifespan.
- What’s Great: This guide offers clear, step-by-step instructions to confidently replace a critical part and save on professional repair costs.
- What’s Not: The process requires careful attention to safety and specific tools, making it unsuitable for those unfamiliar with basic mechanical repairs.
- Buy If: You own a Makita XML02 mower with a worn rear shaft and prefer to handle maintenance and repairs yourself using genuine OEM parts.
- Avoid If: You are uncomfortable working with power tools or prefer to leave complex repairs to certified professionals.
- Affiliate Link Present: Yes
- Price at Review Date: The Makita Rear Shaft 165669-8 was listed at $37.14.
- Available At: The genuine MAKITA OEM part is available on Amazon.
The Makita rear shaft 165669-8 is key to keeping your equipment working . If it starts to wear down, you should replace it with a genuine MAKITA OEM part. Using authentic parts makes sure your tool runs and stays reliable. A lot of tool users face breakdowns that they could avoid by doing regular maintenance and using the right parts.
The rear shaft plays a key role in keeping the rotational movement of your Makita rear handle saw running . If you own this Makita tool, you know how this small part plays a big role in making the tool last longer by stopping mechanical breakdowns. Unlike off-brand options, the genuine MAKITA design ensures an exact fit and works perfectly since it’s made to match the tool without any issues.
This guide explains how to change the rear shaft 165669-8 in your XML02. It takes you through each step, from getting everything ready to taking out the damaged shaft and putting in the new one. At the end, you’ll check if your repair works . These instructions help you bring your tool back to peak shape without having to pay for a professional.
Disclaimer
Affiliate Disclaimer
I want to be 100% honest with you. Some links you see in my post are ‘affiliate links’. This just means if you click one of my links and then buy a tool, I get a very small money from the shop.
This does not cost you any extra money at all. The price is the same for you.
This small help lets me keep this blog alive and test more tools for you. Please know, I only link to tools I have used myself or received a verified review of the tool and believe are good. My words and my review are my own, nobody pays me to say nice things. Thank you for your support!
Image Information
All product images used in this post are provided by the author and claimed to be their own usage. According to the author, these images are either self-clicked, taken during hands-on testing, or screenshots captured for review purposes. If you believe any image violates your rights, please contact us for proper credit or removal.
Price & Stock Information
The product prices and availability mentioned in this post are accurate as of the time of publishing. However, prices may change on the seller’s website without notice. Please always check the latest price and stock status on the official product page before making a purchase decision.

Getting Ready to Replace the Rear Shaft on Makita XML02
Get ready before replacing the rear shaft on your Makita XML02. Preparing ahead will keep things safe and help you finish the job well. Taking a step-by-step approach can stop any harm to your makita rear handle tool and make the work smoother.
Steps To Stay Safe Before Taking It Apart
Safety comes first when you’re dealing with power tools. Make sure the engine on the Makita XML02 is cool before starting. Always take out the battery cartridge and lock key to avoid any accidental start-up that could cause injuries.
To stay safe with electricity, avoid touching grounded surfaces like pipes or radiators. This can help prevent electric shocks. Also run the mower when it is put together. Using tools that aren’t assembled can lead to injuries from them starting by accident.
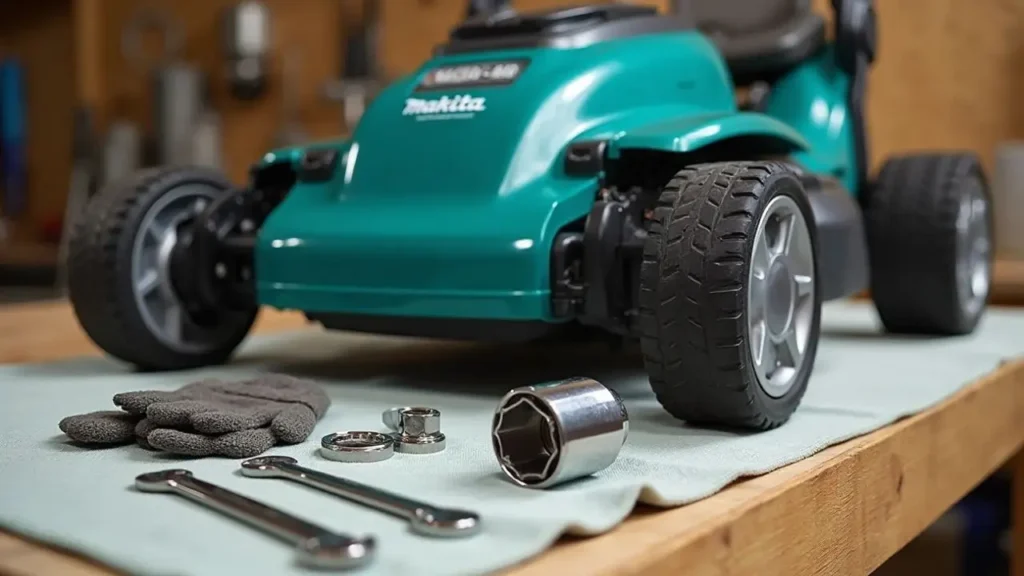
Tools Checklist: Wrenches, Screwdrivers, Gloves
To replace the rear shaft collect these tools ahead of time:
- 13mm spanner/wrench (you’ll need this to loosen the wheel nuts)
- Phillips screwdriver (used to take out screws)
- Safety glasses (to keep your eyes safe while working)
- Protective gloves (wear these when handling blades or machine parts)
- Non-skid shoes (they help keep you steady while working)

- Acc. to DIN 894, ISO 3318
- Jaw set at 15°
- GEDORE vanadium steel 31CrV3

- Dual material handle provides a more comfortable grip and higher performance
- Non-slip black oxide tip for secure fit in clasp
- Ergonomic three-lobe dual material handle ensures the optimal balance of strength and efficiency
Using the right tools makes the work smoother and helps protect parts of your makita rear handle saw while replacing components.
Turning Off Power and Removing the Battery
Disconnecting power is important to handle maintenance . Start by stopping the motor entirely. Then take out the lock key and keep it somewhere safe where kids cannot get to it. After that, take the battery pack off the tool. This step is vital before adjusting anything or swapping out accessories.
Keep in mind that charged batteries can carry a risk of causing electrocution. To stay safe, you should either discharge them or even better, remove them while working on the repair. Once you’ve put the battery back, check if the cover is locked. This prevents mud, dirt, or water from causing any harm.
After getting everything ready, you’re set to begin replacing the makita rear shaft without any unnecessary risks.
Steps to Take Out the Old Rear Shaft
Taking out the worn-out makita rear shaft 165669-8 means taking apart the parts of the rear wheel assembly. A proper method will let you remove the damaged part without creating extra problems for your mower.
Taking Off Rear Wheel Cap and Hex Nut
Start by putting your Makita XML02 on a solid even surface to stop it from moving around while you take it apart. Take off the wheel caps from the back wheels first. You can pop them off by pressing around the edges since they’re made to come off . When you remove them, you’ll see hex nuts holding the wheels onto the back shaft.
Grab a 13mm ring spanner or wrench to loosen the M8 collared hex nuts. To stop the shaft from turning while you work, stick a screwdriver into the bell crank mechanism to hold the axle steady for now. Watch out for washers near the nuts because you’ll have to put those back on when reassembling later.
Removing Rear Wheel and Bearings
Take off the hex nuts first then slide the rear wheels off the shaft. While the wheels are off, check them for any signs of damage since this is a good chance to inspect their condition.
Next, focus on the bearings. You’ll find ball bearings (6200ZZ type) inside the wheels. Remove them by tapping the edge of each wheel with a plastic hammer. To remove plane bearings, use tools meant to extract bearings and press them out . Treat all bearings with care because damage or dirt can mess with the smooth function of your makita rear handle mower.

- JTAREA 304 Stainless Steel Precision Balls Kit.
- SOLID MATERIAL : Made of 304 stainless steel, it is smooth without burrs, high precision, not easy to deform and corrosi…
- EASY TO USE : 304 stainless steel precision balls are installed between the inner and outer rings – Reduces friction and…
Extracting the Rear Shaft 165669-8
To start, take off the wheels and parts that go with them to access the rear shaft. Begin by finding the protective shield if your model includes one for North American standards. Unscrew the two 4×18 tapping screws holding it in place and set them aside.
Next, unscrew the two M5-8 hex lock nuts. Take out the connecting rod that attaches to the height adjustment system. This separates the shaft from the mower’s height control setup.
, take out the six 4×18 tapping screws that keep the rear shaft assembly attached to the mower deck. Once you remove these screws, you can pull out the old rear shaft (part #165669-8) from the mower. Put the old shaft aside to install the new part.
Installing the New Rear Shaft and Putting It Back Together
When you remove the old part putting in the new makita rear shaft 165669-8 takes care to make sure it works as it should. The steps to install it are the reverse of removing it.
Aligning the New Shaft with the Axle Housing
Start by lining up the new makita rear shaft with the axle housing . Match the keyways on the shaft to the slots in the housing to position it . Push the shaft into place until it fits snugly within the housing. Check that the shaft spins without sticking or catching to confirm it is aligned .
Securing Bearings and Mounting the Rear Wheel
After placing the shaft, put the ball bearings (6200ZZ type) on both ends. Make sure to position the bearings so the sealed side faces outward. This stops dirt from getting in. Next, push the rear wheels (part #453243-7) onto each side of the shaft. Keep the wheels lined up with the shaft to avoid them sticking.

- [Vehicle Fitment]: Compatible with Subaru Forester 2014-2018, Impreza 2012-2014 (Base or Sport Limited or Sport Premium …
- [High Load Capacity]: A-Premium wheel bearing hub assembly comes with ball or roller bearing, which can provide perfect …
- [Ideal Solution]: The old rusty hub bearings on your car will appear these three problem after years of use: unusual noi…
Securing Screws and Checking Alignment
Replace the M8 collared hex nuts (part #252145-2) to secure the assembly. Tighten them until they hold but still let the wheel turn . Proper alignment helps stop vibration and makes sure the parts last longer. Check both wheels to confirm they are level and move . Once done, put back all the tapping screws (4×18) to attach the shaft assembly to the mower deck.

- M8 Hex Nuts Size – Thread Size: M8; Pitch Size: 1.25mm; Measurement System: Metric; Hex Height: 6.5mm; Hex Width: 13mm; …
- Carbon Steel – Our M8-1.25 hex nuts is made of good quality Carbon Steel, can provides strength and great protection; Du…
- Metric Hex Nuts – You will get 30 pieces standard hex nuts with a plastic storage case, with good thread; Great replacem…
Testing and Final Steps After Installation
After installing the makita rear shaft, testing ensures the repair went as planned. These checks confirm that your XML02 works after maintenance.
Connecting the Battery and Turning It On
Before turning it on place the battery pack back into the mower. Make sure the battery compartment stays clean with no dirt or blockages. Push the batteries in until you hear a click. If the connection is loose, the mower might not work . Certain models can hold four batteries, but you need two to run it. After inserting them, shut the battery cover to keep mud or water from causing harm.
Check Wheel Movement and Balance
Once you restore power test how the wheels rotate. Start by ensuring both rear wheels rest flat on the ground. If one wheel is higher than the other, it means the shaft wasn’t installed . Even if everything looks fine always check if the self-propelled function works . The wheels need to turn without shaking or stiffness. Strange noises or extra friction need to be addressed right away.
Fixing Problems After Replacement
Still, problems might happen even after careful installation:
- Battery Connection Issues: The mower could fail to turn while still powering accessories if the battery isn’t seated .
- Problems with Height Adjustment: The rear shaft ties into the height adjustment system. Check if it functions once replaced.
- Misaligned Wheels: A wheel not sitting flush with the ground may mean the shaft needs adjusting.
Each battery pair takes around 30 to 45 minutes to charge. Use this time to handle any fix-ups you’re working on.
Wrapping Things Up
Swapping out the Makita rear shaft 165669-8 on your XML02 takes a bit of effort, but it’s a straightforward fix. This repair can help you keep more cash in your pocket and make your tool last longer. In this guide, we showed every important step you need to take starting with handling power and safety basics all the way to testing things when you’re done. Always remember, staying safe comes first when working with mechanical parts or unplugging power.
That rear shaft might look small, but it holds a big role in how steady and efficient your mower works. If you stick to our step-by-step tips, you can get your XML02 back to running like new without needing outside help. Make sure you go with genuine MAKITA OEM parts because they fit just right and hold up better than generic ones.
Doing simple upkeep like swapping out the shaft helps stop major breakdowns later. Fixing it yourself also boosts your confidence to handle similar repairs down the road. This guide aims to give you the know-how needed to replace the rear shaft .
Make sure you put away your tools when you’re done, and keep the manual close by to use it when needed. Keeping your Makita XML02 in good shape will pay off with dependable use for years making the time spent on this repair worth it.
Key Points to Know
Learn how to change the rear shaft 165669-8 on your Makita XML02 mower and bring it back to its best performance with this detailed guide.
- Put safety first: Take out the battery and lock key, and let the machine cool before starting the disassembly steps on your Makita XML02.
- Gather the right tools: You’ll need a 13mm wrench, a Phillips screwdriver, safety glasses, and gloves to protect your hands during the shaft replacement.
- Take things off step by step: Start by removing the wheel caps then move to the hex nuts, wheels, and , the bearings before pulling out the old rear shaft assembly.
- Install with care: Place the new shaft in its spot. Attach the bearings and wheels back in order, and make sure they’re lined up before tightening everything down.
- Do a full test: Plug in the battery, spin the wheels to check they rotate right and feel stable, and if there are issues with alignment or connections, fix them right away.
Using original MAKITA OEM parts guarantees the right fit and longer use than off-brand options. Fixing it yourself saves cash and helps you feel more prepared to handle repairs later on. This can stop bigger issues and keep your mower running well.
FAQs
Q1. What tools are required to replace the Makita rear shaft 165669-8? You need a 13mm wrench, a Phillips screwdriver, safety glasses, and sturdy gloves. These tools are needed to take your Makita XML02 mower apart and put it back together safely.
Q2. How can I stay safe while replacing the rear shaft? Take out the battery and lock key before beginning. Make sure the mower has cooled off . Wear gear like gloves and safety glasses during the work.
Q3. How do I take out the old rear shaft the right way? First, remove the hex nuts and wheel caps. Next, take off the rear wheels and bearings. Disconnect the height adjuster last then unscrew the shaft assembly to pull out the old shaft.
Q4. How do I install the new rear shaft? Line up the new shaft with the axle housing first. Attach the bearings and put the rear wheels back in place. Use the hex nuts to secure everything . Double-check that things are aligned then tighten all the screws.
Q5. What should I look for after installing the new rear shaft? Once it’s installed, reconnect the battery. Test if the wheels rotate and feel stable. Make sure the self-propelled function works without issues and check if the height adjustment moves . Fix any strange noises or resistance you notice right away.